


Learning how to sight in a crossbow scope is one of the first things you should do after setting up a new crossbow. Even if your crossbow arrives with the scope already mounted or factory-sighted, you shouldn’t assume that it’s perfectly zeroed for your particular setup.
Different arrows, scope settings and even small changes to the way a scope is mounted can affect where your arrows land. Fortunately, sighting in a crossbow scope isn’t particularly difficult. You mainly need a suitable target, a measured shooting distance and a little patience.
In this guide, we’ll take you through the process step by step, explain what the different scope adjustments actually do, and look at how to sight in both fixed multi-reticle and speed-adjustable crossbow scopes.
If you’re still getting familiar with your crossbow, our How to Choose a Crossbow guide explains the main features and specifications you’ll come across.
Table of Contents
What Does “Sighting In” a Crossbow Mean?
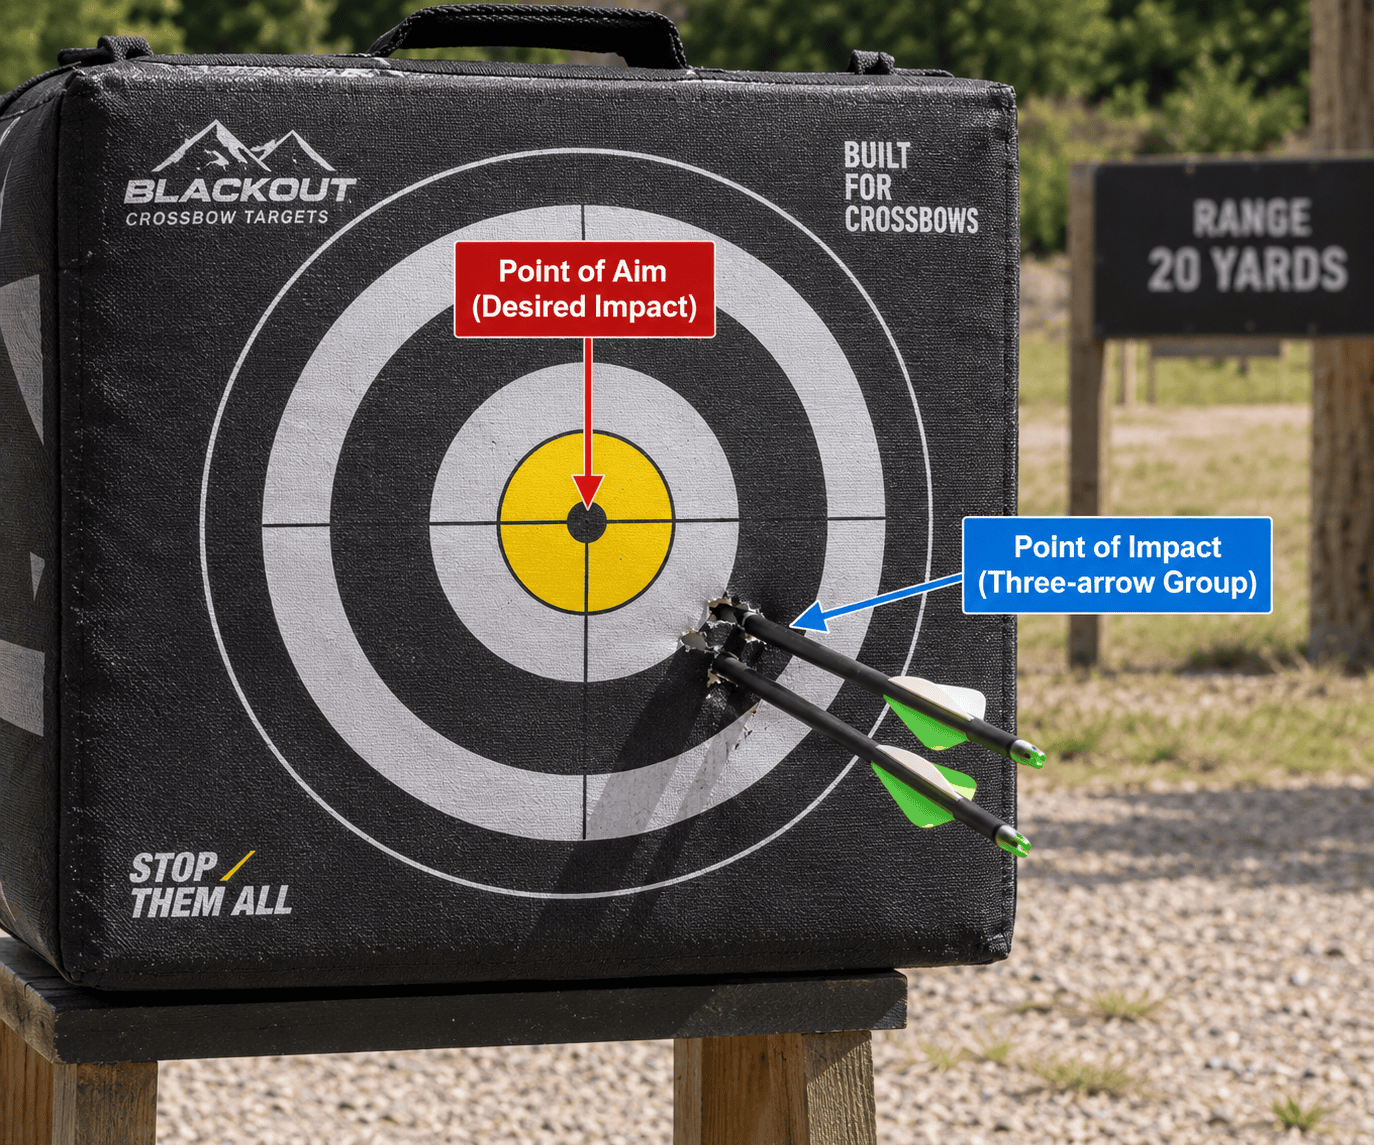
Sighting in — also known as zeroing — simply means adjusting your scope so that the point you’re aiming at matches the point where your arrow actually hits the target at a known distance.
For example, if you’re aiming at the centre of a target from 20 yards but your arrows consistently land three inches to the left, your scope needs a windage adjustment.
If they’re landing three inches below the centre, you’ll need to adjust the elevation.
Once the scope is properly zeroed at your starting distance, you can begin checking the other aiming points in the reticle at longer ranges.
This is particularly important with crossbows because arrows follow a much more pronounced trajectory than rifle bullets. Crossbow scopes therefore usually have several aiming points designed to compensate for arrow drop at increasing distances.
Before You Start: What You’ll Need
You don’t need much equipment to sight in a crossbow scope, but getting everything organised beforehand makes the process much easier.
You’ll need:
- Your crossbow and fitted scope
- The arrows you normally intend to use
- A crossbow-rated target
- A rangefinder or accurately measured shooting distances
- A stable shooting rest or bench
- A safe shooting area with a suitable backstop
- The manual for your particular scope
Using the same arrows throughout the process is particularly important. Changing arrow weight halfway through sighting can alter both speed and trajectory, making your previous adjustments less useful.
You should also inspect the crossbow, scope rings and arrows before shooting.
Before heading to the range, it’s worth reviewing our Crossbow Safety Basics for New Owners, particularly if this is your first time setting up a crossbow.
How to Sight In a Crossbow Scope
The exact procedure varies slightly between scope manufacturers, but the basic process is fairly consistent.
One important exception is the starting distance. Some manufacturers recommend beginning at 20 yards, while others recommend taking your first shots at 10 yards to make sure you’re safely on the target before moving farther back.
Always check the instructions supplied with your crossbow and scope first.
Step 1: Check That the Scope Is Mounted Correctly
Before adjusting anything, make sure the scope itself is secure.
Check that:
- The scope rings are properly tightened
- The scope isn’t moving inside the rings
- The reticle appears level
- You have comfortable eye relief
- The reticle is clearly focused
Don’t immediately start turning the adjustment turrets if your arrows are behaving strangely. A loose or incorrectly mounted scope can make accurate zeroing virtually impossible.
If your scope has an adjustable eyepiece, focus the reticle before beginning.
You want the crosshairs or aiming points to appear sharp as soon as you look through the scope rather than having to strain your eyes to bring them into focus.
Step 2: Check Your Scope’s Speed Setting
This step only applies if you’re using a crossbow scope with a speed or arrow-drop compensation dial.
These scopes use the approximate speed of the arrow to determine the spacing between the different yardage markers in the reticle.
As a starting point, set the scope to the manufacturer’s recommended speed for your crossbow and arrow combination.
Remember that the maximum FPS printed on a crossbow isn’t necessarily the exact speed of the arrows you’re shooting. Arrow weight affects velocity, and a heavier arrow will generally leave the crossbow more slowly than a lighter one.
If you have access to a chronograph, measuring the actual speed of your chosen arrow gives you an even better starting point.
This relationship between arrow speed, arrow weight and energy is covered in more detail in How Powerful Does a Crossbow Need to Be?
Step 3: Start at Close Range
A common mistake is immediately setting the target at 40 or 50 yards.
Don’t.
If the scope is badly out of alignment, your first arrow could miss the target completely.
Some manufacturers recommend starting at around 10 yards simply to confirm that your arrows are landing safely on the target. Others instruct you to begin the actual zeroing process at 20 yards.
If you’re uncertain how close the scope is to zero, beginning at 10 yards is the safer approach.
Fire a small group rather than making an adjustment based on one arrow.
Three arrows are normally enough to show whether there’s a consistent difference between your point of aim and point of impact.
If the arrows are grouping together but away from the bullseye, the scope probably needs adjustment.
If the arrows are scattered across the target, however, don’t immediately blame the scope. Check your shooting technique, arrow condition and equipment first.
Step 4: Move to 20 Yards
Once you’re confident that you’re safely hitting the target, move back to 20 yards.
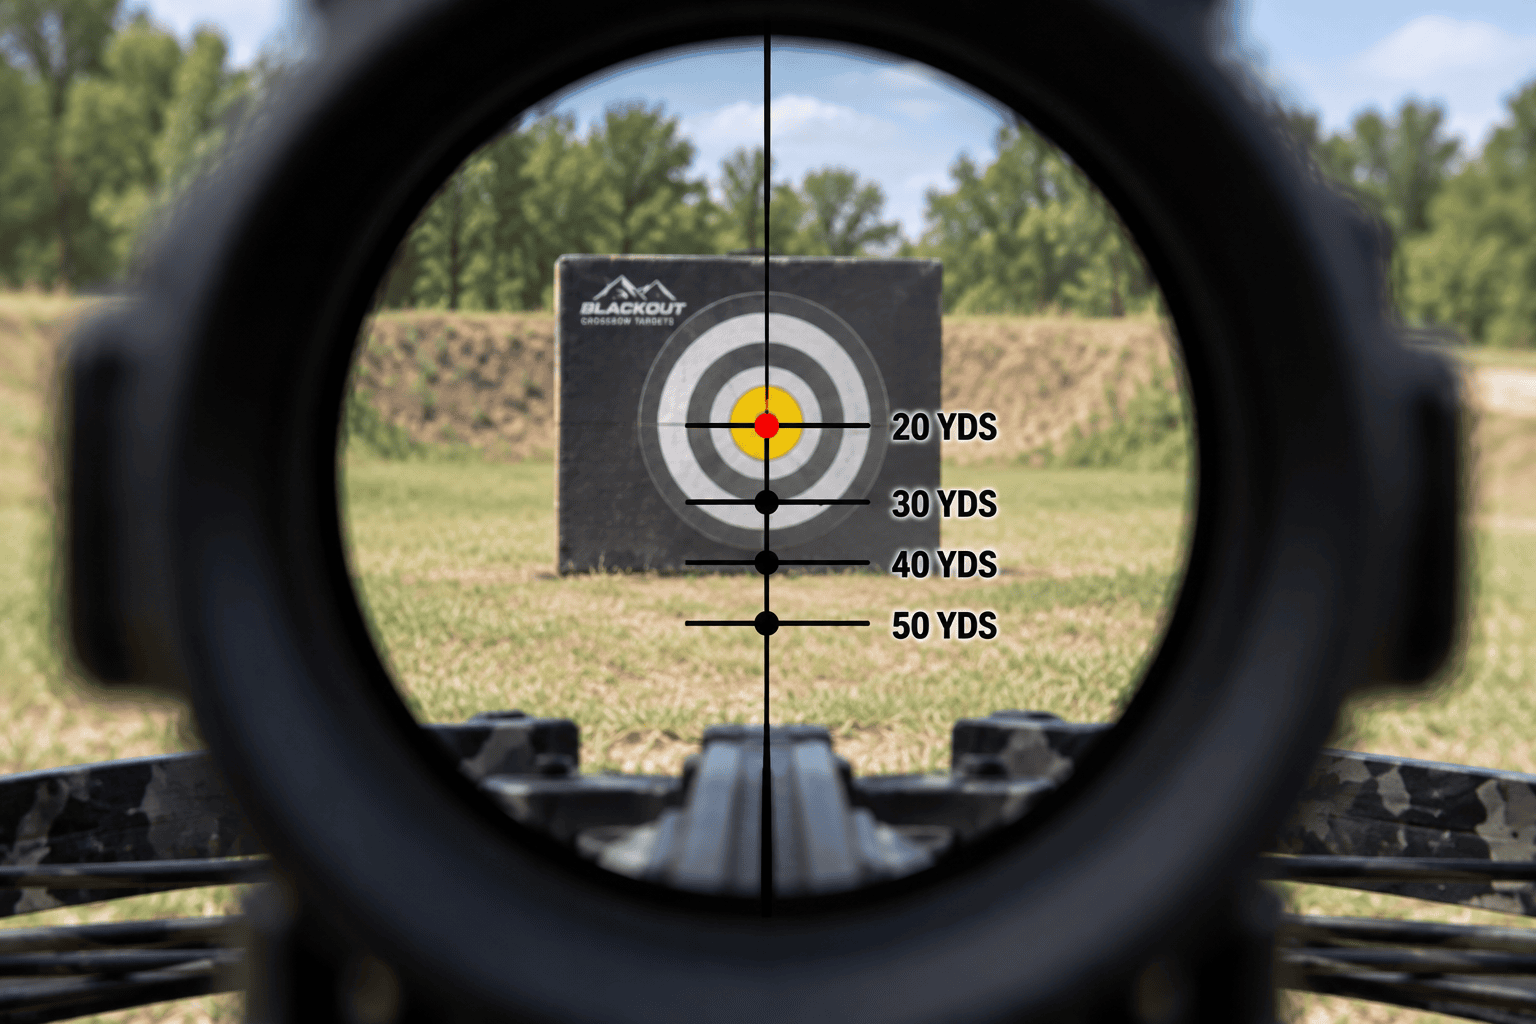
For many crossbow scopes, the uppermost crosshair, dot or line represents the 20-yard aiming point.
Aim at the centre of the target and fire another group.
Now compare your point of aim with your point of impact.
For example, your group might be:
- 2 inches low
- 1 inch right
This tells you that both elevation and windage need adjusting.
Step 5: Adjust the Windage
Windage controls horizontal movement — left and right.
The adjustment turret is usually located on the side of the scope.
Most scopes mark the turret with an arrow showing which direction moves the point of impact.
If your arrows consistently hit left of where you’re aiming, adjust the point of impact to the right.
If they’re hitting right, adjust it to the left.
Make small adjustments and then fire another group.
Don’t chase individual arrows around the target. You’re looking for the centre of the group rather than trying to correct every slightly misplaced shot.
Step 6: Adjust the Elevation
Elevation controls vertical movement — up and down.
The elevation turret is normally located on top of the scope.
If your group is consistently below your aiming point, adjust the point of impact upward.
If the group is above the aiming point, adjust it downward.
Again, make small adjustments before firing another group.
Scopes differ in how much each click moves the point of impact, so check your scope manual rather than assuming a particular click value.
Continue adjusting until your group is centred around your aiming point.
You now have your initial zero.
Step 7: Move Back and Verify the Other Reticles
Getting the 20-yard aiming point correct doesn’t mean you’ve finished.
Move the target farther away and check the additional aiming points.
Depending on your scope, these might represent:
- 20 yards
- 30 yards
- 40 yards
- 50 yards
Some modern scopes provide aiming points considerably beyond this.
However, the markings should never simply be assumed to be perfectly accurate for your crossbow.
The trajectory depends on your actual arrow speed and arrow weight, which means the real distance represented by each line can vary between setups.
Fire groups at measured distances and learn exactly where your particular crossbow hits.
Step 8: Fine-Tune a Speed-Adjustable Scope
If your scope has a speed dial, the longer-distance test becomes particularly important.
After establishing your initial zero, follow the manufacturer’s instructions for checking the scope at its recommended calibration distance.
This might be 40 or 50 yards depending on the scope.
At this stage, you may use the speed adjustment rather than continually altering the elevation turret.
For example, TenPoint’s instructions for some variable-speed scopes recommend establishing the initial zero at 20 yards and then checking the appropriate reticle farther downrange. The speed setting can then be fine-tuned so that the remaining aiming points better correspond with the actual trajectory of the arrow.
Different scopes use different calibration procedures, however, so don’t assume that the adjustment method for one model applies to another.
Follow the instructions for your particular scope.
TenPoint provides a useful guide to sighting in a variable-power drop-compensating crossbow scope, including how the speed dial affects longer-range aiming points.
Fixed Multi-Reticle vs Speed-Adjustable Crossbow Scopes
It’s useful to understand which type of scope you have because the sighting process isn’t quite the same.
Fixed Multi-Reticle Scope
A fixed multi-reticle scope usually has several horizontal lines or dots.
These represent progressively longer distances, but their exact yardages depend partly on the speed of your crossbow.
A typical scope might approximately represent 20, 30, 40 and 50 yards.
You establish the primary zero using windage and elevation and then test the additional aiming points at their intended distances.
If your crossbow’s arrow speed differs substantially from the speed for which the scope was designed, the additional reticles may not correspond perfectly with those distances.
Speed-Adjustable Scope
A speed-adjustable scope adds another control.
The speed dial changes the relationship between the aiming points to compensate for the trajectory of arrows travelling at different velocities.
That makes the scope adaptable to a wider range of crossbows and arrow combinations.
The important thing is not to use the speed dial as though it were simply another elevation adjustment.
Establish your initial zero using the procedure specified by the manufacturer, then use the speed setting to calibrate the additional aiming points as instructed.
Don’t Sight In Using Just One Arrow
One arrow can be misleading.
Even a well-tuned crossbow won’t necessarily put every arrow through exactly the same hole. Small differences in shooting technique, arrows and conditions can move individual shots.
Instead, shoot groups.
If three arrows all land two inches left, you have useful information.
If one lands left, one right and one high, changing the scope may make matters worse.
Before adjusting anything, establish whether you have a zeroing problem or a grouping problem.
If you’re new to crossbows and still deciding what level of performance you actually need, see our Best Crossbows for Beginners guide.
Common Crossbow Scope Sighting Mistakes
Making Huge Adjustments
It’s tempting to make a large correction when your first group isn’t centred.
Small, controlled adjustments are easier to track.
Make an adjustment, shoot another group and see what changed.
Adjusting After Every Arrow
One poor shot doesn’t necessarily mean the scope needs adjusting.
Work with groups rather than individual arrows.
Using Different Arrows
Switching between arrows of substantially different weights can change the point of impact.
Sight in using the same arrow setup you intend to shoot.
Assuming the Reticle Yardages Are Exact
A line marked or described as a 40-yard aiming point isn’t automatically perfect at exactly 40 yards with every crossbow.
Verify it yourself.
Forgetting to Check the Scope Mount
If your zero appears to move constantly, check the mounting system.
A loose scope or ring can produce inconsistent results that no amount of turret adjustment will solve.
Using the Advertised Maximum Speed as Gospel
Crossbow manufacturers often advertise an FPS figure achieved with a particular arrow configuration.
Your actual arrow may travel at a different speed.
This matters especially when calibrating a speed-adjustable scope.
Sighting In at Distances You Can’t Shoot Consistently
There’s little benefit in trying to calibrate a scope at 70 or 80 yards if your groups at that distance aren’t consistent enough to tell whether an error is coming from the scope or the shooter.
Build outward gradually.
Should You Sight In a Crossbow With Broadheads?
If you intend to hunt where crossbow hunting is legal, your final setup should be checked with the same arrow and broadhead configuration you intend to use.
Don’t simply assume that a hunting broadhead will hit exactly where a field point does.
Changes in weight, balance and aerodynamics can affect point of impact.
First establish your basic zero with suitable practice points, then verify your hunting setup separately before relying on it.
Always use a target specifically designed to safely stop the broadheads you’re shooting.
How Often Should You Check Your Crossbow Zero?
Checking zero isn’t something you should only do when you buy the crossbow.
It’s sensible to check it:
- Before the start of a shooting or hunting season
- After transporting the crossbow over a long distance
- After changing arrows
- After changing broadheads or other components
- If the crossbow or scope receives a significant knock
- If accuracy suddenly changes
- After removing and reinstalling the scope
Even if nothing has changed, periodically confirming your zero is good practice.
A few arrows on the range are much better than discovering a problem when accuracy actually matters.
What If Your Crossbow Still Won’t Group?
If you’ve followed the sighting procedure but your arrows still won’t group consistently, the scope might not actually be the problem.
Check:
- Scope rings and mounting hardware
- Arrow condition
- Arrow weight and compatibility
- Nocks
- String and cables
- Cocking consistency
- Shooting rest
- Trigger technique
Also try another known-good arrow.
Consistent groups that are simply in the wrong place usually indicate a zeroing issue.
Large, unpredictable groups suggest that something else may be happening.
If you can’t identify the cause, stop using the crossbow and have it checked by a competent archery technician rather than continually adjusting the scope.
How Accurate Should a Sighted-In Crossbow Be?
There’s no single answer because accuracy depends on the crossbow, arrows, scope, distance, conditions and shooter.
More important than chasing an arbitrary group size is repeatability.
A properly sighted crossbow should produce consistent groups around your point of aim at distances you’re comfortable shooting.
As you move farther away, small inconsistencies become increasingly significant.
That’s another reason to work outward gradually rather than sighting at 20 yards and immediately assuming the scope will be perfect at much longer ranges.
For a broader look at the different types of crossbows and how their designs affect performance, see Recurve vs Compound Crossbows: Pros & Cons.
Final Thoughts
Learning how to sight in a crossbow scope is mostly a matter of working methodically.
Start close enough to make sure you’re safely on the target, establish your primary zero, and then gradually increase the distance while checking each aiming point.
The biggest mistake is assuming that the numbers printed on the crossbow or scope automatically translate into exactly the same trajectory on the range.
Your arrows, their weight, the scope and the crossbow itself all form part of the system.
Once everything is dialled in, write down your confirmed aiming points and keep them with your equipment. And whenever you change an important part of your setup, take the time to check your zero again before relying on it.
A properly sighted scope doesn’t just make a crossbow more accurate — it gives you confidence that when you put the reticle on the target, you know where the arrow is actually going.